AER: LA DÉVIATION
It all started with an idea for an environment project. My friend Alexandre GAUCH and I imagined a fantasy city built atop several gigantic stone pillars. Our goal was to challenge ourselves by animating various elements within the environment, using wind and mechanical technology to bring the scene to life. With that concept in mind, I began gathering visual references to strengthen and expand our vision of the world we wanted to create.
Here is the final result of this project, i used Houdini Arnold for the layout and rendering and the compositing was done on Nuke by my friend Alexandre GAUCH
Here is the render without compositing

The Team

ROGET Maxime
Alexandre GAUCH

Foreground Side

Backgound Side
For this project, I worked on all aspect of the foreground environment, focusing on layout, main asset lookdev and lighting,
while Alexandre Gauch handled the background, including the scatter setup, stone pillars, and compositing.
Our goal was to merge our two worlds seamlessly — creating a unified atmosphere where both the mechanical and natural elements interact through wind, motion, and light.
We decided to set our project in a sunset atmosphere inspired by the French Riviera. To ground our vision in reality, we gathered a few friends and traveled to Saint-Cyr-sur-Mer to collect references, this marked the true beginning of our pre-production phase. We explored several iconic locations around the area, including the famous Calanques de Marseille, La Ciotat, and even Cassis. With the project always in mind, we captured numerous photos and videos, aiming to meticulously craft a believable and immersive fantasy environment rooted in real-world textures and lighting.
i shooted some footage with a Sony A7S3.


The French Riviera’s beauty offered the perfect backdrop, not only for reference gathering but also for taking a much-needed break from our final-year student production, which was then nearing the end of its pre-production phase.


Before diving into the concept art and overall pre-production, I want to talk about something that deeply influenced me and shaped my vision for this project. Through my readings, and quite by chance, I came across a story that completely shifted my perspective: La Déviation by Moebius. This short, surreal tale had a profound impact on how I approached the world-building and atmosphere of our environment.
So let's talk about the story of moebius, La Déviation.

This story, which I discovered just before the famous Arzach, became my greatest source of inspiration, both through its striking visuals and the underlying moral it carries.

La Déviation is a short comic by Jean Giraud, also known as Moebius, originally published in 1973 in the magazine Pilote.
It’s a surreal, dreamlike, and absurd science fiction story that follows Jean Giraud and his wife Claudine on their way to vacation on the Île de Ré. Their journey takes an unexpected turn when they follow a road detour—une déviation—that leads them into a strange and nightmarish parallel universe.
As they venture further, they encounter bizarre obstacles such as "those who prevent passage" and a colossal supermarket that sucks them into an alternate reality.
The narrative breaks away from traditional storytelling, diving deep into Moebius’s unrestrained imagination. Rich in dark humor and visual delirium, the story plays with absurdity and symbolism.
Visually, the comic is striking in its black-and-white precision, shifting between realism and experimental drawing. It marks a clear departure from Giraud’s more classic Western style seen in Blueberry, revealing the surrealist dimension that would become a hallmark of Moebius’s later work.
The verticality in Moebius’s depiction of French towns, combined with the absurd and burlesque atmosphere of his storytelling, deeply resonated with me. It immediately made me think of the massive stone pillars we envisioned for our own project.
The underlying message in Giraud’s work helped me understand why I was drawn to creating a world that, on the surface, might seem absurd—but in truth, isn't absurd at all. Through metaphor, he explores the idea that following the main, conventional road offers safety and predictability, while taking a detour, a deviation, leads to something more unpredictable and strange, where you gradually lose control of both your mind and your destiny.
In the end, that journey into the unknown isn't absurd—it's meaningful.


With this strong foundation in place, we began developing concept art to guide our creative direction. Our goal was to build a fantasy world that could evoke the feeling of being on vacation—a place filled with wonder, calm, and a touch of escape.

We started by creating a quick layout in Blender, using simple cubes to establish perspective and get a first sense of the composition. This base was then brought into Photoshop, where we painted over the scene to add details and develop the atmosphere of our concept.
Next, we moved on to building the heightfield, blocking out the environment, and setting up the layout using both Houdini and Blender—especially to prepare for the camera animation and to ensure everything worked spatially within the scene.


To design the paths, trails, and cliffs, we looked beyond our initial references and turned to more rugged Asian mountain landscapes—particularly those from Thailand and Japan. We made this choice to achieve better definition and resolution in the environment. We realized that the real cliffs from our main reference location were quite smooth and didn’t catch the light effectively. In 3D, however, adding more surface detail is essential to make the environment visually engaging and to ensure that the lighting enhances the forms.

After I described my vision for the project, a friend gave me some valuable feedback: he suggested freeing up space in the foreground to better invite the viewer into the scene and create a stronger sense of immersion.
Thanks to Marius, Victor and Marine, from the buzz l'equerre production : LinkedIn of the team , my 2d's friends who gave me some retakes on the cinematographic composition of our shot !
Pavement tool:
To guide the viewer’s eye more effectively toward the right side of the scene, I created a pavement tool generator that produces a fully customizable trail. This trail seamlessly blends with the ground, adapting to its normals and curves for a natural, integrated look.


This magic node worked wonders in adding incredible variety to the pavement! Don’t forget to use it—it’s become my absolute best friend. Sorry, Voronoi fracture node, but you’ve been officially replaced!


We designed a camera movement that begins by revealing the side of a mountain, then gradually shifts to showcase the horizon and finally the other towering stone pillars.


We continued by creating small assets to populate and enrich the various parts of the environment.


Grass generator:
For the smaller vegetation, I created a tool that generates scattered patches of grass with natural curves and randomness. The main wheat fields are also fully procedural, allowing us to tweak various parameters for added customization.


Rock generator:
We created a tool to personalize a rock fastly, and a tool who generate rock for the smaller one:

We RnD tests on the rocks to evaluate the effect of displacement in the final render. This displacement was baked directly in ZBrush using the subdivision workflow, similar to how we handled the normal maps.


without displacement
with displacement baked

Townhouse:
I alwayI’ve always been inspired by the traditional medieval houses from Normandy—places like Rouen and Honfleur. I wanted to create buildings rooted in reality and as realistic as possible. In a fantasy world featuring enormous, unrealistic stone pillars, it’s important to include familiar, believable assets to help convey the scale of the scene and maintain credible perspectives.


House_VAR4
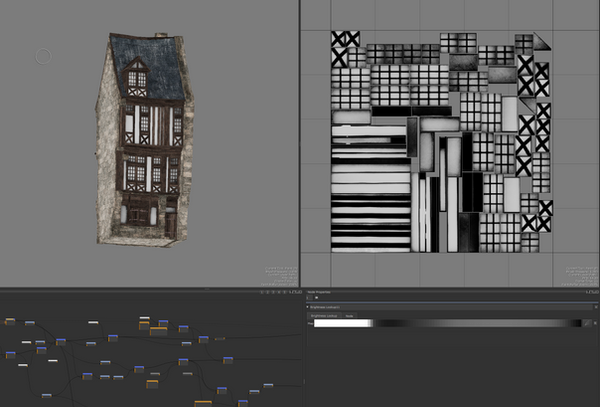

I exported a map called “MAS,” with each channel containing different RGB information. This map can be separated by the lookdev artist during shading, giving them greater flexibility to customize materials and add subtle touches of realism.


ANIMATION CONSTRAINT:
We began the project with the goal of capturing the sensation of wind throughout the entire environment. As you’ve seen earlier, we started by building a windmill and some trees with this in mind. Our animation focused on rotating the windmill blades and adding subtle noise to the trees to bring realism to the final render.
Then, inspired by the cliff references, a new idea came to me. When thinking of high-altitude mountains, prayer flags naturally come to mind. So, I created an asset that not only adds movement to the rocky environment but also guides the viewer’s eye along the flowing strings, enhancing the visual direction and immersion.
Pray flag fabric tissue
I developed a tool that creates a torn, weathered effect commonly seen on fabrics exposed to the elements over time, especially in windy conditions.
Here’s a breakdown of how the tool works and how it can be customized to add personality and control the direction and shape of the tears in the fabric.


i made some alpha for the prayflag with some image like enluminure


Here is the final textured prayer flag result.
Don’t forget to add some fabric opacity to give the cloth an extra layer of realism.


The simulation is divided into three separate parts: the strings, the prayer flag cloth, and the prayer flag pins.


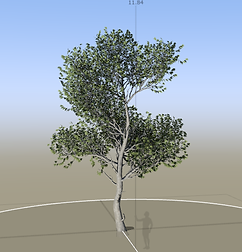
Tree setup (made by Alexandre GAUCH)
The tree was created using SpeedTree. Since the wind is gentle, we didn’t need extensive FX on the asset. SpeedTree’s built-in animation feature, which applies a single noise-based effect, provided exactly the subtle movement required, nothing more, nothing less.
Tree animated in speedtree on a soften wind reference, this asset was made by my friend.

main reference


main result tree
Wheat setup
I separated the largest grass blades from the rest to add animation specifically to them. This optimization helps reduce memory and cache usage while still creating the illusion that all the grass is gently moving.


I created this texture in Mari, with few reference shot, and projections.
To optimize RAM and storage, I created a low-poly proxy version of my wheat.
This makes animation much easier due to the reduced polygon count. Using Houdini’s deformbake node, I replicated the animation onto the high-detail wheat that will be rendered. Then, by adding a few more grass assets around it, the overall scene looks much richer and more realistic.
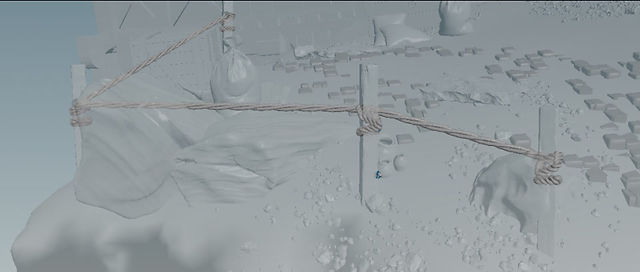
Rope setup:
The rope is the final group of assets to be animated in the scene. It uses a simple Vellum solver with minimal adjustments.
This element is designed to be a subtle secondary or tertiary focus for the viewer’s eye. The animation needs to be delicate and understated—if it’s too noticeable, it risks distracting or overwhelming the viewer’s intended visual flow.

AND FINALLY....
This project represents the culmination of four years of learning Houdini and environmental design. I wanted to showcase my skills through the creation of several HDAs and apply everything I’ve learned during both pre-production and production. Starting from a simple idea, I merged it with the vision of my friend and translated it into a project that remained as pragmatic as possible, especially considering the demands of our other final-year student projects, which have occupied most of our time this year.